
스마트시대
Build the register and login functions 본문

Make the base.html file for check the frontend part working.

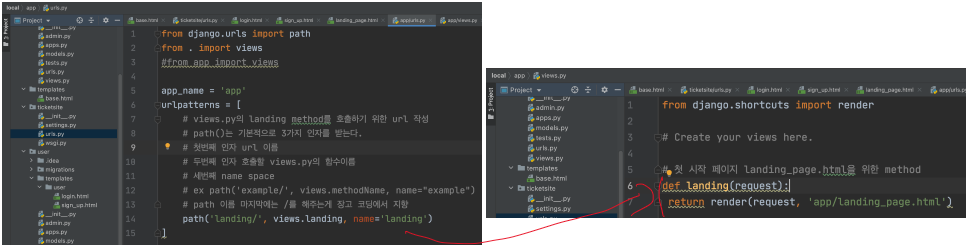
app_name specifies the name of the 'user' directory and writes the code as above.
For rendering, writes the login funtion like above. (user-> views.py)

'DIRS' is the code specifing the directory of base.html.
# base.html

<!DOCTYPE html>
<html lang="en">
<head>
    <meta charset="UTF-8">
    <meta http-equiv="X-UA-Compatible" content="IE=edge">
    <meta name="viewport" content="width=device-width, initial-scale=1.0">
    <title>Document</title>
</head>
<body>
    <!-- 간단한 네비게이션바 -->
    <div>
        <a href="#">홈</a>
        <a href="#">로그인</a>
        <a href="#"></a>
    </div>
    <!--  -->
</body>
</html>
Make a navigation bar in the base.html temporarily.

Since the red part is the content that changes continuously, the content of the red part is displayed in another HTML file.

Since you need a login registration HTML, create a templates folder in the user (app) folder, a user (same as the app name) folder in the templates folder, and login.html, sign_up.html in it.

For login method, connect to login.html in login function. Also for register method, connect to sign_up.html in register function.

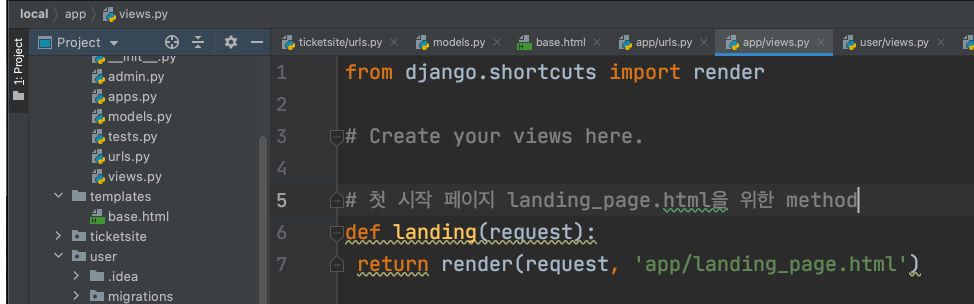
For first page create the landing_page.html in landing function.

If you enter the 'https://127.0.0.1/login' address, when you write login as the first parameter in the path now, the login method written in views.py of the user app is executed. Since the path you write now is the part where you write the path that shows lading_page.html, you must report the pathname other than login. Also, Django recommand to put '/' in end of path address.


So, first extend base.html like this, declare block content and endblock, and now write the landing page content in it.
Mainly, this kind of template is for layout.

For first page, write the code like this that need to show the landing page not login page.

You can see showing landing page for the first page. Also it is shown the app/landing_page.html contents.

You have to write all the URLs on the ticket site you created. The reason to make a URL for each app is to manage the URL efficiently. If you write all the URLs in the ticket site directory(in URLs.py), you will be confused about what URL this is and where it is managed. So now It can be worked the URL like this.
If you want to go to the login page, you have to write the original Django URL in urls.py in the ticketsite directory you created.
If the size of the project grows, if there are 50 URLs, all 50 will be used. Since it may be challenging to track what kind of URL this is, I make a necessary urls.py for each app and inherit it with including.
If 127.0.0.1/user is appended, user.urls is traced.
This is because if you use account, you can use the name you want as the first argument of the path after 'account/' (I choose the url name at will).

I'll write in while until I sign up as a member!
If login or register written in user.urls comes after 127.0.0.1/account/, views.py suitable for each url is executed.
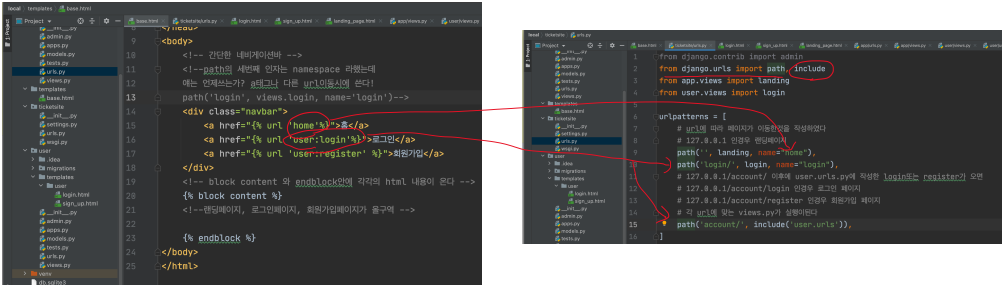
It should be connected to the A tag
※How to write href: {% url 'app_name:namespace' %}
The reason why only home is written is that you just write down what you declared in ticketsite.urls.
To write a landing (probably 127.0.0.1/login if you want to do this). You have to include it like before.
'Programing > Django' 카테고리의 다른 글
| Make the branch environment on Github (0) | 2021.07.25 |
|---|---|
| 회원가입, 로그인 페이지 작성(user디렉토리) (0) | 2021.07.14 |
| Django admin 사이트 구축 (0) | 2021.07.14 |
| Django model 구축 (0) | 2021.07.14 |
| Django 프로젝트 시작과 설정 변경 (0) | 2021.07.14 |


