
스마트시대
ONBOARDING 5.1 Interests Screen 5.2 Scroll Animations 5.3 Tutorial Screen 5.4 AnimatedCrossFade 본문
Programing/Flutter
ONBOARDING 5.1 Interests Screen 5.2 Scroll Animations 5.3 Tutorial Screen 5.4 AnimatedCrossFade
스마트시대 2023. 5. 8. 15:08728x90
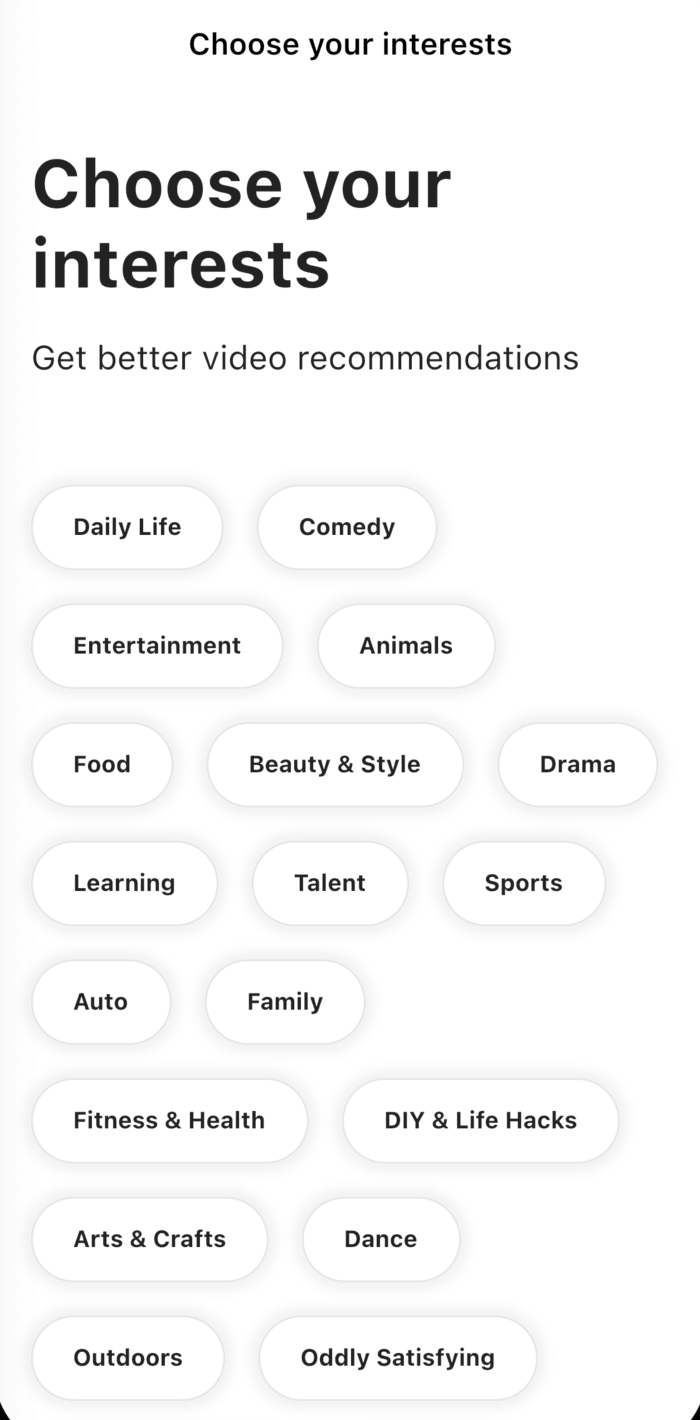
5.1 Interests Screen
import 'package:flutter/material.dart';
import 'package:tiktok_clone/constants/gaps.dart';
import 'package:tiktok_clone/constants/sizes.dart';

const interests = [
  "Daily Life",
  "Comedy",
  "Entertainment",
  "Animals",
  "Food",
  "Beauty & Style",
  "Drama",
  "Learning",
  "Talent",
  "Sports",
  "Auto",
  "Family",
  "Fitness & Health",
  "DIY & Life Hacks",
  "Arts & Crafts",
  "Dance",
  "Outdoors",
  "Oddly Satisfying",
  "Home & Garden",
  "Daily Life",
  "Comedy",
  "Entertainment",
  "Animals",
  "Food",
  "Beauty & Style",
  "Drama",
  "Learning",
  "Talent",
  "Sports",
  "Auto",
  "Family",
  "Fitness & Health",
  "DIY & Life Hacks",
  "Arts & Crafts",
  "Dance",
  "Outdoors",
  "Oddly Satisfying",
  "Home & Garden",
];

class InterestsScreen extends StatelessWidget {
  const InterestsScreen({super.key});

  @override
  Widget build(BuildContext context) {
    return Scaffold(
      appBar: AppBar(
        title: const Text("Choose your interests"),
      ),
      body: Padding(
        padding: const EdgeInsets.symmetric(
          horizontal: Sizes.size24,
        ),
        child: Column(
          crossAxisAlignment:
              CrossAxisAlignment.start, // column에서 crossAxis교차축은 가로
          children: [
            Gaps.v32,
            const Text(
              "Choose your interests",
              style: TextStyle(
                fontSize: Sizes.size40,
                fontWeight: FontWeight.bold,
              ),
            ),
            Gaps.v20,
            const Text(
              "Get better video recommendations",
              style: TextStyle(
                fontSize: Sizes.size20,
              ),
            ),
            Gaps.v64,
            for (var interest in interests)
              Container(
                padding: const EdgeInsets.symmetric(
                  vertical: Sizes.size12,
                  horizontal: Sizes.size24,
                ),
                decoration: BoxDecoration(
                    color: Colors.white,
                    borderRadius: BorderRadius.circular(
                      Sizes.size32,
                    ),
                    boxShadow: [
                      BoxShadow(
                        color: Colors.black.withOpacity(0.05),
                        blurRadius: 5,
                        spreadRadius: 5,
                      ),
                    ]),
                child: Text(
                  interest,
                  style: const TextStyle(
                    fontWeight: FontWeight.bold,
                  ),
                ),
              ),
          ],
        ),
      ),
    );
  }
}
밑에 표시되는 에러는 wrap으로 고쳐주기
   --------------------
// SingleChildScrollView: scroll가능하게
      body: SingleChildScrollView(
         --------------------
        child: Padding(

 Gaps.v64,

   --------------------
              Wrap(
                runSpacing: 20,
                spacing: 20,
                children: [
                  for (var interest in interests)
                    Container(
                      padding: const EdgeInsets.symmetric(
                        vertical: Sizes.size16,
                        horizontal: Sizes.size24,
                      ),
                      decoration: BoxDecoration(
                          color: Colors.white,
                          borderRadius: BorderRadius.circular(
                            Sizes.size32,
                          ),
                          border: Border.all(
                            color: Colors.black.withOpacity(0.1),
                          ),
                          boxShadow: [
                            BoxShadow(
                              color: Colors.black.withOpacity(0.05),
                              blurRadius: 5,
                              spreadRadius: 5,
                            ),
                          ]),
                      child: Text(
                        interest,
                        style: const TextStyle(
                          fontWeight: FontWeight.bold,
                        ),
                      ),
                    ),
                ],
              ),
            ],
          ),
        ),
      ),
    );
  }
}
   --------------------
bottombutton만들기
      bottomNavigationBar: BottomAppBar(
        elevation: 2,
        child: Padding(
          padding: const EdgeInsets.only(
            bottom: Sizes.size40,
            top: Sizes.size16,
            left: Sizes.size24,
            right: Sizes.size24,
          ),
          child: Container(
            padding: const EdgeInsets.symmetric(
              vertical: Sizes.size20,
            ),
            decoration: BoxDecoration(
              color: Theme.of(context).primaryColor,
            ),
            child: const Text(
              "Next",
              textAlign: TextAlign.center,
              style: TextStyle(
                color: Colors.white,
                fontSize: Sizes.size16,
              ),
            ),
          ),
        ),
      ),
    );
  }
}
5.2 Scroll Animations
간단하게 이걸로 만들면 되는데
child: GestureDetector(
onTap: _onNextTap,
이게 안 먹으니까 먹이는 방법 찾아보기
              right: Sizes.size24,
            ),
            //5.1에서 만든 버튼 귀찮으면 이걸로
            child: CupertinoButton(
              color: Theme.of(context).primaryColor,
              onPressed: () {},
              child: Text("Next"),
            )),
      ),
    );
  }
}
-----------------
class InterestsScreen extends StatefulWidget {
  const InterestsScreen({super.key});

  @override
  State<InterestsScreen> createState() => _InterestsScreenState();
}

class _InterestsScreenState extends State<InterestsScreen> {
  final ScrollController _scrollController = ScrollController();
-----------------
  @override
  Widget build(BuildContext context) {


  -----------------
        body: Scrollbar(
        controller: _scrollController,
        // SingleChildScrollView: scroll가능하게
        child: SingleChildScrollView(
          controller: _scrollController,
          -----------------

          child: Padding(
            padding: const EdgeInsets.only(
맨위의 choose your interests 생겼다 사라졌다 하게 하기
class _InterestsScreenState extends State<InterestsScreen> {
  final ScrollController _scrollController = ScrollController();
---------------------
  bool _showTitle = false;

  void _onScroll() {
    if (_scrollController.offset > 100) {
      // _scrollController.offset 101,102~~~~~될때 마다 setState되는 거 방지
      // _showTitle이 true면 그냥 return
      if (_showTitle) return;
      setState(() {
        _showTitle = true;
      });
    } else {
      setState(() {
        _showTitle = false;
      });
    }
  }

  @override
  void initState() {
    super.initState();
    _scrollController.addListener(_onScroll);
  }

  @override
  void dispose() {
    _scrollController.dispose();
    super.dispose();
  }

---------------------
  @override
  Widget build(BuildContext context) {


    @override
  Widget build(BuildContext context) {
    return Scaffold(
      appBar: AppBar(

      ---------------------
        // 타이틀 사라졌다 스크롤 하면 다시 생기는 위젯
        title: AnimatedOpacity(
          opacity: _showTitle ? 1 : 0,
          duration: const Duration(microseconds: 300),
          ---------------------

          child: const Text(
            "Choose your interests",
extract widget으로 interest_button.dart 만들기
// 박스 고를 때 글자 색깔과 박스 색깔 변하게 해주는 설정도 같이
import 'package:flutter/material.dart';

import '../../../constants/sizes.dart';

class InterestButton extends StatefulWidget {
  const InterestButton({
    super.key,
    required this.interest,
  });

  final String interest;

  @override
  State<InterestButton> createState() => _InterestButtonState();
}

class _InterestButtonState extends State<InterestButton> {
  bool _isSelected = false;

// 박스 고를 때 글자 색깔과 박스 색깔 변하게 해주는 함수
  void _onTap() {
    setState(() {
      _isSelected = !_isSelected;
    });
  }

  @override
  Widget build(BuildContext context) {
    return GestureDetector(
      onTap: _onTap,
      // 박스 고를 때 글자 색깔과 박스 색깔 변하게 해주는 위젯
      child: AnimatedContainer(
        duration: const Duration(milliseconds: 300),
        padding: const EdgeInsets.symmetric(
          vertical: Sizes.size16,
          horizontal: Sizes.size24,
        ),
        decoration: BoxDecoration(
            // 박스 고를 때 글자 색깔과 박스 색깔 변하게 해주는 위젯
            color: _isSelected ? Theme.of(context).primaryColor : Colors.white,
            borderRadius: BorderRadius.circular(
              Sizes.size32,
            ),
            border: Border.all(
              color: Colors.black.withOpacity(0.1),
            ),
            boxShadow: [
              BoxShadow(
                color: Colors.black.withOpacity(0.05),
                blurRadius: 5,
                spreadRadius: 5,
              ),
            ]),
        child: Text(
          widget.interest,
          style: TextStyle(
            fontWeight: FontWeight.bold,
            // 박스 고를 때 글자 색깔과 박스 색깔 변하게 해주는 위젯
            color: _isSelected ? Colors.white : Colors.black87,
          ),
        ),
      ),
    );
  }
}
5.3 Tutorial Screen
interests_screen.dart에서 Tutorial Screen.dart 가기 위한 설정
  bool _showTitle = false;
---------------
  void _onNextTap() {
    Navigator.push(
      context,
      MaterialPageRoute(
        builder: (context) => const TutorialScreen(),
      ),
    );
  }
---------------
  void _onScroll() {


  -----------------
            child: GestureDetector(
            onTap: _onNextTap,
       -----------------

            child: Container(
              padding: const EdgeInsets.symmetric(
                vertical: Sizes.size16 + Sizes.size2,
              ),
              decoration: BoxDecoration(
appBar안 쓸 때는 safeArea먹여주기


      // appBar안 쓸 때는 safeArea먹여주기
      body: SafeArea(
        child: Column(children: const [
          Text(
            "Watch cool videos",
            style: TextStyle(
              fontSize: Sizes.size40,
              fontWeight: FontWeight.bold,
            ),
          ),
        ]),
      ),
    );
  }
}
// 이미지 슬라이드 할 수 있는 위젯만들기


swipe할 때 어느 페이지에 알게 해주는 UI적 위젯

import 'package:flutter/material.dart';
import 'package:tiktok_clone/constants/gaps.dart';
import 'package:tiktok_clone/constants/sizes.dart';
class TutorialScreen extends StatefulWidget {
const TutorialScreen({super.key});
@override
State<TutorialScreen> createState() => _TutorialScreenState();
}
class _TutorialScreenState extends State<TutorialScreen> {
@override
Widget build(BuildContext context) {
return DefaultTabController(
length: 3,
child: Scaffold(
body: SafeArea(
child: TabBarView(
children: [
Padding(
padding: const EdgeInsets.symmetric(
horizontal: Sizes.size24,
),
child: Column(
crossAxisAlignment: CrossAxisAlignment.start,
children: const [
Gaps.v52,
Text(
"Watch cool videos!",
style: TextStyle(
fontSize: Sizes.size40,
fontWeight: FontWeight.bold,
),
),
Gaps.v16,
Text(
"Videos are personalized for you based on what you watch, like, and share.",
style: TextStyle(
fontSize: Sizes.size20,
),
),
],
),
),
Padding(
padding: const EdgeInsets.symmetric(
horizontal: Sizes.size24,
),
child: Column(
crossAxisAlignment: CrossAxisAlignment.start,
children: const [
Gaps.v52,
Text(
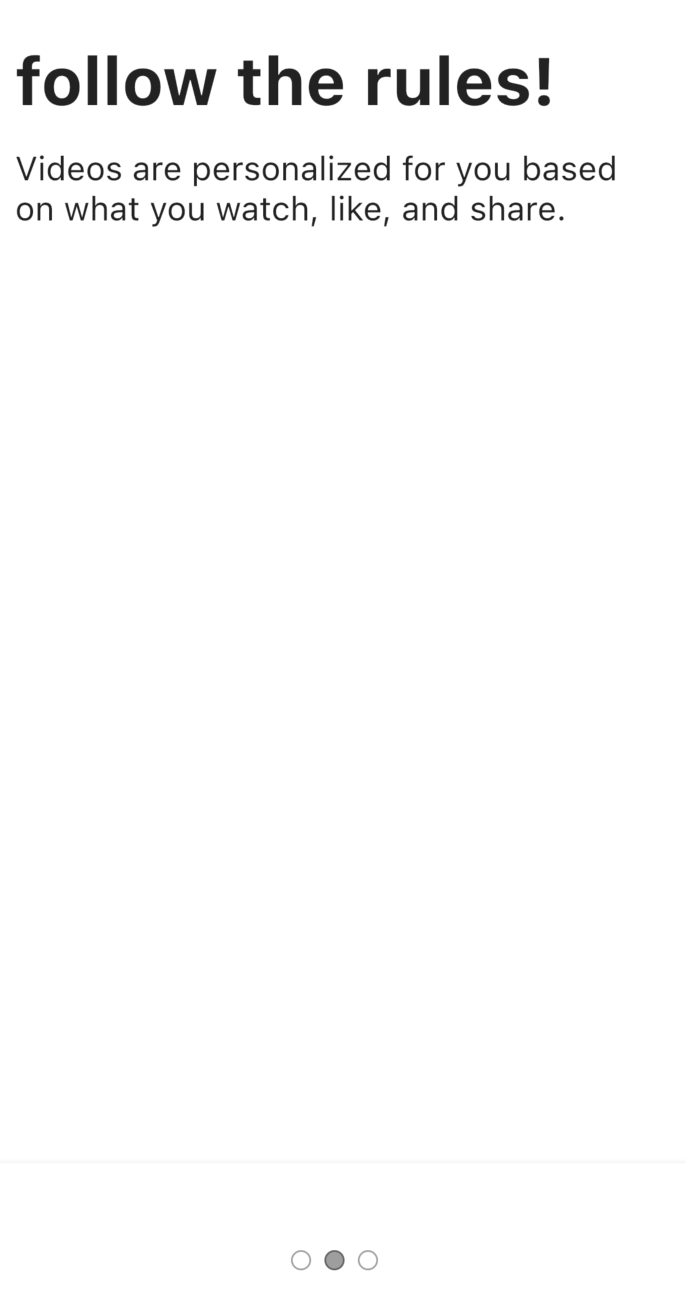
"Follow the rules!",
style: TextStyle(
fontSize: Sizes.size40,
fontWeight: FontWeight.bold,
),
),
Gaps.v16,
Text(
"Videos are personalized for you based on what you watch, like, and share.",
style: TextStyle(
fontSize: Sizes.size20,
),
),
],
),
),
Padding(
padding: const EdgeInsets.symmetric(
horizontal: Sizes.size24,
),
child: Column(
crossAxisAlignment: CrossAxisAlignment.start,
children: const [
Gaps.v52,
Text(
"Enjoy the ride",
style: TextStyle(
fontSize: Sizes.size40,
fontWeight: FontWeight.bold,
),
),
Gaps.v16,
Text(
"Videos are personalized for you based on what you watch, like, and share.",
style: TextStyle(
fontSize: Sizes.size20,
),
),
],
),
),
],
),
),
bottomNavigationBar: BottomAppBar(
child: Container(
padding: const EdgeInsets.symmetric(
vertical: Sizes.size48,
),
child: Row(
mainAxisAlignment: MainAxisAlignment.center,
children: const [
TabPageSelector(
color: Colors.white,
selectedColor: Colors.black38,
),
],
),
),
),
),
);
}
}
5.4 AnimatedCrossFade
5.3에서 한 코드 다 지우고 AnimatedCrossFade사용하기
import 'package:flutter/material.dart';
import 'package:tiktok_clone/constants/gaps.dart';

import '../../constants/sizes.dart';

//dragging 파라메터의 state를 저장하기 위해
enum Direction { right, left }

//dragging end 파라메터의 state를 저장하기 위해
enum Page { first, second }

class TutorialScreen extends StatefulWidget {
  const TutorialScreen({super.key});

  @override
  State<TutorialScreen> createState() => _TutorialScreenState();
}

class _TutorialScreenState extends State<TutorialScreen> {
  //direction의 디폴트는 오른쪽; Direction타입의 state
  Direction _direction = Direction.right;
  Page _showingPage = Page.first;

  // dragging 파라메터
  void _onPanUpdate(DragUpdateDetails details) {
    if (details.delta.dx > 0) {
      // to the right
      setState(() {
        _direction = Direction.right;
      });
    } else {
      // to the left
      setState(() {
        _direction = Direction.left;
      });

      //print(details);
    }
  }

// dragging end 파라메터
  void _onPanEnd(DragEndDetails detail) {
    if (_direction == Direction.left) {
      setState(() {
        _showingPage = Page.second;
      });
    } else {
      setState(() {
        _showingPage = Page.first;
      });
    }
  }

  @override
  Widget build(BuildContext context) {
    return GestureDetector(
      // 화면을 넘기는 스와이프를 GestureDetector는 pan이라고 함
      onPanUpdate: _onPanUpdate, // dragging 행위 callback(오른쪽으로 손가락이나 마우스로 스와이프)
      onPanEnd: _onPanEnd, // dragging end callback
      child: Scaffold(
        // appBar 안 쓸 때는 이거 먹여주기
        body: Padding(
          padding: const EdgeInsets.symmetric(horizontal: Sizes.size24),
          child: SafeArea(
            // 두 애니메이션의 fade-in,out구현해주는 위젯
            child: AnimatedCrossFade(
              firstChild: Column(
                crossAxisAlignment: CrossAxisAlignment.start,
                children: const [
                  Gaps.v80,
                  Text(
                    "Watch cool videos!",
                    style: TextStyle(
                      fontSize: Sizes.size40,
                      fontWeight: FontWeight.bold,
                    ),
                  ),
                  Gaps.v16,
                  Text(
                    "Videos are personalized for you based on what you watch, like, and share.",
                    style: TextStyle(
                      fontSize: Sizes.size20,
                    ),
                  ),
                ],
              ),
              secondChild: Column(
                crossAxisAlignment: CrossAxisAlignment.start,
                children: const [
                  Gaps.v80,
                  Text(
                    "Follow the rules!",
                    style: TextStyle(
                      fontSize: Sizes.size40,
                      fontWeight: FontWeight.bold,
                    ),
                  ),
                  Gaps.v16,
                  Text(
                    ""Take care of one another! Plis!",
                    style: TextStyle(
                      fontSize: Sizes.size20,
                    ),
                  ),
                ],
              ),
              // AnimatedCrossFade에게 어떤 걸 보여줄지 결정해주는 파라메터
              crossFadeState: _showingPage == Page.first
                  ? CrossFadeState.showFirst
                  : CrossFadeState.showSecond,
              duration: const Duration(milliseconds: 300),
            ),
          ),
        ),
      ),
    );
  }
}
/////////////////////////////

bottomNavigationBar: BottomAppBar(
          child: Padding(
            padding: const EdgeInsets.symmetric(
              vertical: Sizes.size24,
              horizontal: Sizes.size24,
            ),
            child: AnimatedOpacity(
              // first page에서는 button 안보이게 하기
              duration: const Duration(milliseconds: 300),
              opacity: _showingPage == Page.first ? 0 : 1,
              child: CupertinoButton(
                onPressed: () {},
                color: Theme.of(context).primaryColor,
                child: const Text("Enter the app!"),
              ),
            ),
          ),
        ),
      ),
    );
  }
}

728x90
반응형
'Programing > Flutter' 카테고리의 다른 글
'Programing/Flutter' Related Articles
more


Comments